Secret Beach Engagement

IMG_9541
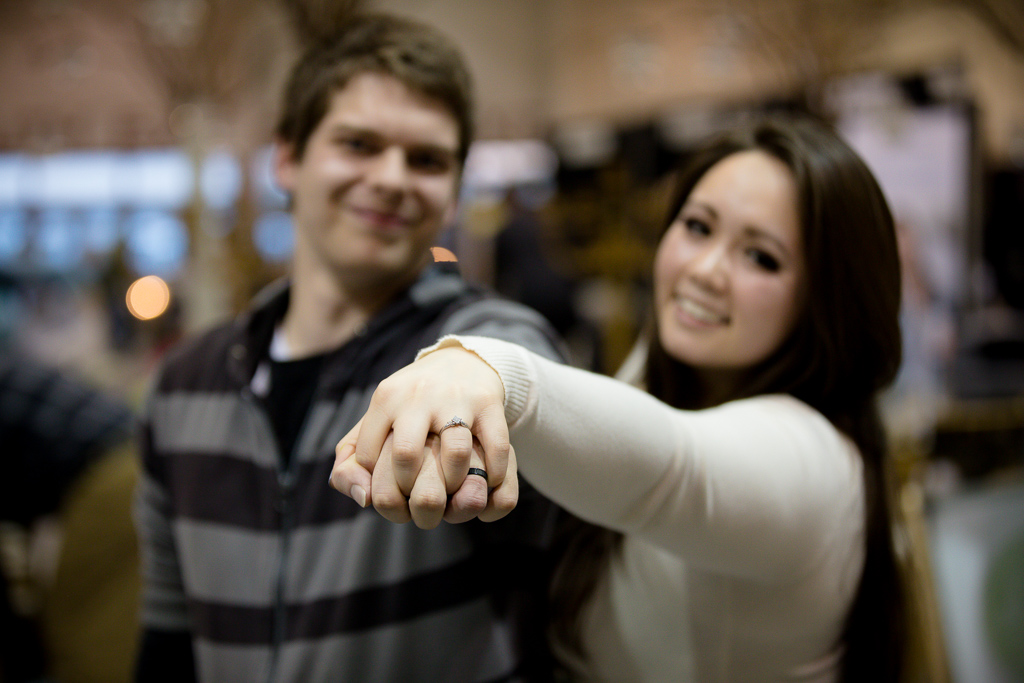
Have you ever heard about a secret wedding engagement? Sure, oftentimes the person proposing willkeep it a secret until they are ready to pop the question, but in the case of one groom-to-be, he thought ahead.

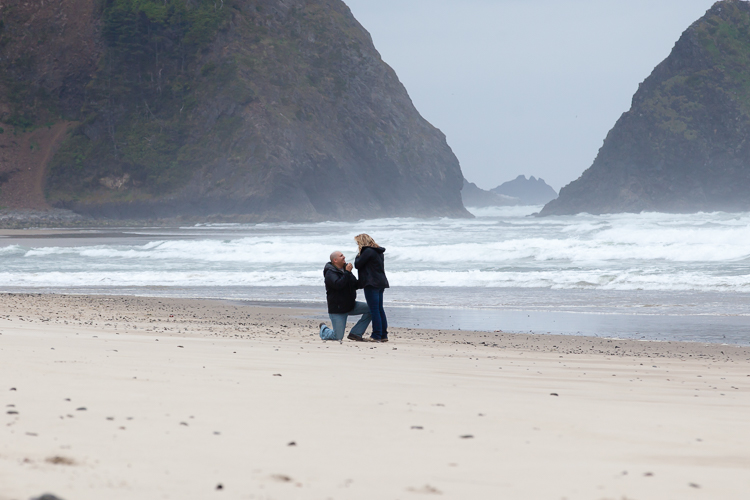
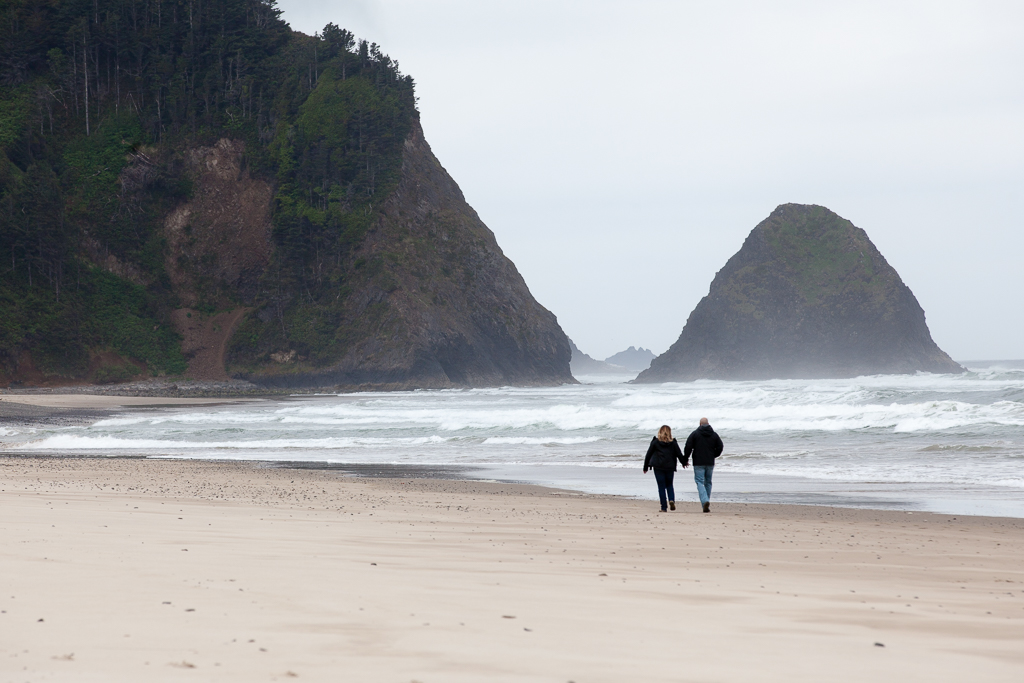
He planned how he was going to propose to his future wife and decided to whisk her away to the Oregon Coast for a vacation where he would propose for her hand in marriage. But that’s not all. He also wanted that memory to be a special surprise for her even on the wedding day!


IMG_9536

IMG_9556Thinking ahead to his wedding day, this groom called me and together we planned a secret photo shoot at the beach. The plan was for him to take his girlfriend onto the sand at a remote Oregon beach and propose to her, but he didn’t want her to know that I was there photographing the event. So I staged a fake beach shoot of a model where I looked like I was taking photos of the model, but I was really shooting right over her shoulder to the couple near the surf.

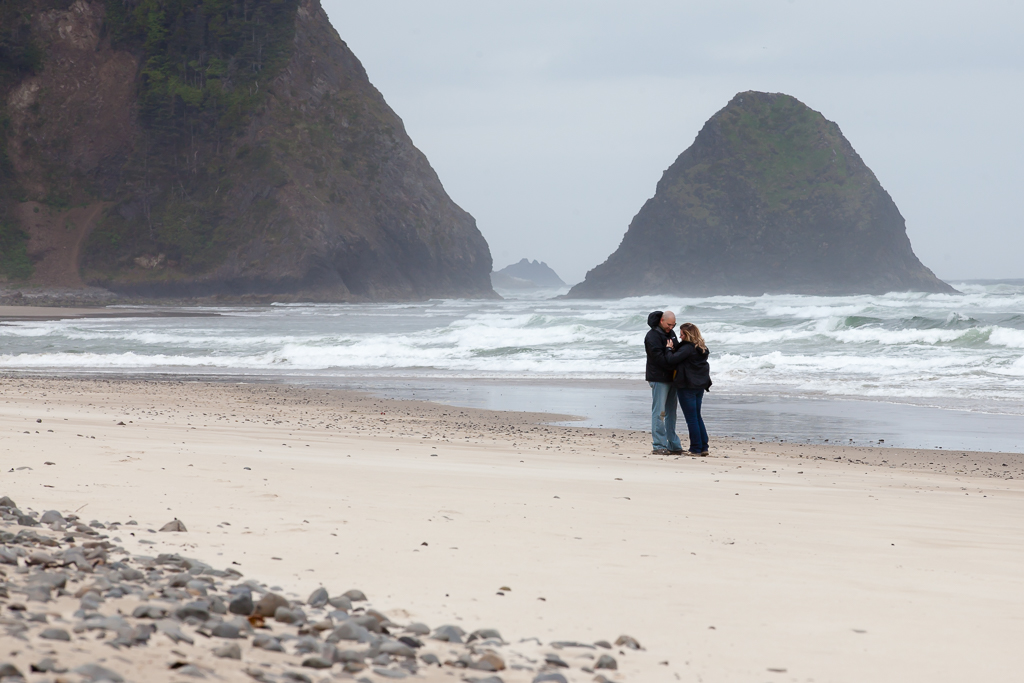
As I saw the couple on the beach and the proposal happen, capturing their photos from a distance, I thought how amazing it was for me to do business with someone without ever meeting them, because the photos were a surprise for the bride on her wedding day. What a moment to remember!

I love capturing great photos of people and events, but I love the creative opportunities our clients come up with even more. If you have a great idea for creative wedding or engagement photos, please bring those ideas when you come see us!


The best weather conditions for portraits

My favorite weather conditions to take portraits in is when it’s cloudy. Can you believe it? Bright sun definitely makes for a boost in morale, but it’s really the days when it’s cloudy that I prefer to take portraits in.

Nadia Senior Photo

Why is that, you ask?

When it’s cloudy, the light is spread out better and colors are more even. If you’ve ever been in a photo studio, you might have noticed those large white screens. Those screens are small versions of clouds. Light is bounced around and reduces shadows, leaving your photos looking better. Fortunately for me, I primarily shoot in the Pacific Northwest where clouds abound. I feel very luck in this respect. I have even nicknamed Oregon the “land of diffuse light”. =-)7B4A0262

Don’t get me wrong about sunlight though. I love to shoot on the sunniest of days as well. Sometimes I’ll position you in the sun for shots, but on these kinds of days, I will usually have the light blocked with either a scrim or I will just position you in the shade.

So don’t worry about scheduling your outdoor photo shoot with me during the fall, winter or spring in the Pacific Northwest. I will keep tabs on the weather so that we can get great images for you!7B4A0961

Nadia Senior Photo

3 Posing Tips for Your Portrait Session

Part of the reason why I love photography is because I don’t have to be in front of the camera =-).

If that sounds like you too, then I have some important advice for you that I’ve learned from being in front of the camera that can make your portrait session much more rewarding.

7B4A3407

Be yourself

One of the best things you can do to improve your portrait shoot is to be yourself. Really! From behind the camera, it’s very obvious when my subject is uncomfortable because they are not acting like themselves. Stiff body lines, pasted grins and body language translate to photos that are not comfortable and whoever sees those photos will understand the same thing. It’s those moments where your happiness are captured and frozen in time that you will see every time you look at that photo that make it a great experience.


Trust your photographer7B4A3750-Edit

I want to take photos of my portrait sessions as perfectly as I can. I want you to go home with your photos feeling and looking your best because I have a happy client and because I can use that photo to promote my photography business. If you come to the session knowing that I am there to make you look your absolute best, then you can feel safe that how I direct you is helping you look great. Trusting your photographer helps you both have a great session experience and get great portraits.


Come preparedIMG_1068

There are many things you can do to come prepared to your photo shoot. It all depends on what you want to get out of it. A few things that I recommend thinking about prior to your shoot are your clothing and color choices and bring props or an activity that you enjoy. It will make your session more relaxing and fun.


– Photos By Orion

3 Things to Know Before Scheduling Your Spring Portraits

7B4A3750-Edit
Alexis and the Cherry Blossoms

Natural light is your friend

Have you ever had a photoshoot scheduled and it looks like it’s going to rain shortly before your outdoor-Oregon family photo session? Don’t worry too much about it, call your photographer up and see if they think it’ll still be a good time to take photos. If the weather is like many Spring days in Oregon are, there is likely a chance that that dull gray sky will actually enhance your photos. I like to think of those dull gray clouds as a gigantic light diffuser. Talk to your photographer to see if the weather will be good or not, you may be surprised.

IMG_5162
Danika in the Japanese Wisteria

Great foliage backdrops

Spring time is the best time to go out and capture family photos with excellent greenery and flowers. The grass is vibrant green and the flowers are usually plentiful and colorful. If you don’t have a special place in mind for your photoshoot, your photographer will. I have several places around the Willamette Valley that I enjoy taking clients to and I typically try to schedule photoshoots around the times when those flowers and trees look their best. A personal favorite are the Japanese Wisteria in Bush Park.

OK
The Davidsons in jackets


Clothing Choices

The weather in Oregon during the Spring is a time of change and your clothing choices should follow suit. =-) I recommend being prepared for both rain and sun. If you happen to have a new jacket, bring it along. It may go great with the background. Not every photoshoot needs to be formal.

Props

Sometimes, props can be great add-ons to a session. Here in Oregon, an umbrella may not get used in the rain, but it can make a great prop for photos! Giving it a little thought and grabbing a couple things that are special to you can take a good photo session to great in a flash.


From your photography team at Photos By Orion

What does a typical wedding ceremony look like?

You’re engaged, planning your wedding, checking out dresses, and are super excited to start meeting with vendors. They ask you about your ceremony and you suddenly realize you have no idea how to put together a wedding ceremony! You start to freak out as you add yet another thing to your list of to-do’s that is already a mile long, but take a deep breath and relax for a minute.

A wedding ceremony can be as simple or as complicated as you want to make it. Realistically, the list I have compiled below is what happens in a typical American ceremony. Different cultures will change this accordingly. I have tried to keep this list as bare-bones as possible, just the things that are typical and/or necessary, and labeled everything else optional. If you follow this simple formula you can have a ceremony plan in a few short minutes!

Wedding Ceremony Elements

Processionals – where the wedding party and parents of the couple walk in. Typically the parents are seated by ushers or groomsmen/attendants (attendants = the people standing with the couple up front, not the guests) first, then the groom/partner#1 walks in with the officiant, then bridesmaids/groomsmen/attendants walk in, followed by the ring bearer. Finally, the flower girls/grandmas/people walk in just ahead of the bride/partner #2.

žBride/Partner entrance

žOfficiant opening remarks – These are typically short comments welcome, of what makes a marriage work.

žCharge to the couple – This is the remark about the couple coming together seeking a committed relationship and that they are here to take the other person as their husband/wife/partner.

žVows – These are your promises to each other. They can be the same to each other or completely different. They can be repeated after the officiant or read from a paper. However and whatever you choose to promise to your soon to be spouse, this is the important part of the ceremony as it is what will bring you together. Spend time on your vows, be honest and committed to what you say here.

žRing exchanges

žUnity event – (optional) I have included this because about half of all weddings have some sort of unity event. Some examples I have seen are unity candles, hand-fastenings, and sand/bead/candy ceremonies, although this could truly be anything that brings two things together into one.

žPronouncement of marriage – “…By the power vested in me…”

žThe Kiss

žClosing Remarks and presentation of couple – “May I be the first to present…”

žRecessionals – wedding party walks back in reverse order.

There are many ways to make the wedding ceremony all your own, but as long as you start with this framework you will be good to go.

Comment below to let me know if I missed anything. These are the elements I have noticed in my wedding photography career as going into a typical ceremony.

Getting started on your wedding photo “Must Have” list

Your “Must Have” list is a very important part of your wedding planning. It not only determines the amount of time you need for your photography, but it also helps you with your timeline planning, with the order of events, with knowing if you need one or two photographers, and if there are other options like bridal portraits that will help you keep your wedding on track and on budget.

The list given below is a general list that I have used to help my clients over the past 10 years plan their wedding day photography. It is by no means completely inclusive, but I have found it helps my clients start the process of making their own list. While the list is written in “Bride and Groom” language, the ideas and concepts can be used for any wedding couple!

For planning purposes, plan to set aside 3-5 minutes per pose/picture on your list. This is a great starting time reference.

“Must have” wedding photo list ideas

Pre-wedding/Getting Ready

Rehearsal area before guests have arrived/details

Prep Shots – Bride & Groom getting ready

The Dress – Hanging or Draped

The Rings – with invitation, bouquet, etc.

Zipping Dress

Bride Applying Make Up

Groom Fixing Hair

Attaching Boutonnière to grooms lapel

Ceremony

Groom waiting at altar

Church Wide Shot (with & without guests)

Bride walking down aisle ( Side Profile & Front )

Father giving away bride

Groom over the shoulder shot of bride ( & Vis Versa)

Holding hands – Bride and Groom

Bride & Groom Kiss

Bride & Groom Leaving Church ( Receiving Line)

Reception

Reception/Banquet Hall Outside shot

Food Shots (Cocktail Hour, Drinks, etc.)

Shot of each table full of guests

Bride and Groom Hand & Ring Portraits

First Dance

Bride & Father Dance

Groom & Mother Dance

Bouquet Toss

Guarder Belt Toss

Cake Cutting

Bride and Groom Feeding each other

Misc. Guests Dancing

Best Man & Maid of Honor Toast/Speeches

Bride & Groom Toast/Speeches

Centerpieces & Flower/Decorations

Guestbook Signatures

Bride & Groom “Just Married” Vehicle – Driving Away

Thank you picture (if doing one)

Posed Photography

Bride alone

Groom alone

Bride and Groom

Bride and Groom at alter

Bride and Groom with Officient

Bride and Groom kissing

Bridesmaids/Flower Girl(s)

Groomsmen/Ring bearer

Bridal Party

Bride with Groomsmen

Groom with Bridesmaids

Bride with Bridesmaids

Groom with Groomsmen

Bride with flower girl(s)

Groom with ring bearer

Bride and Groom with bridal party

Bride with parents

Groom with parents

Bride and Groom with bride’s parents

Bride and Groom with groom’s parents

Bride and Groom with both sets of parents

Bride and Groom with bride’s grandparents

Bride and Groom with groom’s grandparents

Bride’s parents alone

Groom’s parents alone

Spring portrait opportunity

Child's portrait at Bush Pasture Park in Salem, OR
Beautiful opportunities abound at Bush Pasture Park

Spring time is nearly here and that means there will be some great opportunities for outdoor photography in Salem. One such location that I really enjoy taking photos of families at is Bush’s Pasture Park.

Bush’s Pasture Park is a 90 acre park located just south of downtown Salem. It has several sports fields, including Willamette University’s track and field stadium, a soap box derby track, running trails, open fields and play structures. But that’s not all. It also contains several gardens including a rose garden with gazebo. Wildflowers grow all over the park during the spring and it’s these areas I like to take clients to for photo sessions.

With the plethora of available backgrounds available, I consider Bush’s Pasture Park to be an ideal location for family photo sessions. The rose garden and gazebo are great places to capture classic photos. Add in the few historic buildings in the background and you have an excellent location for photography.

I personally enjoy the extensive Camas meadow. It’s a great location in one of the quieter parts of the park where Camas flowers (Wild hyacinth) bloom in a sweeping bed amongst a small grove of trees. It provides ample shade during hot days and a nice colorful backdrop to photos. (see photo to left). The purple Camas add just enough color to really make the portraits pop.

Family Portrait in Camas medow in Bush Pasture Park Salem, Oregon


Another excellent spot is this one tree near the Bush House and rose garden. It only blooms for about a week each year so getting there can be a bit tricky and you have to be flexible with dates to make it work, but the photos from there are simply amazing and worth the hassle! This tree blooms beautifully purple every year and gives the illusion of being surrounded by wild blooms, making for stunning portraits for a small group or individual.

IMG_9869 IMG_5162 Child's specialty portrait at Bush Pasture Park under blooming tree


The Bush house also offers other beautiful blooms that are around a bit longer than the one tree, and with a large porch there is more room for larger groups.Family Portrait at Bush House in Salem Oregon

Child at Bush House in Salem, Oregon Senior Portrait at Bush House in Salem, Oregon

To book a session at Bush Park, please contact Kathryn at 503-871-8417. For the special tree call between February 15th and April 15th to get on the schedule and we will contact you when the time is right.

After a bridal show: Now what do I do?

Beautiful green and orange bridal bouquet by Stem Designs in Salem, Oregon
Beautiful flowers by Stem Designs

So you just got back from a bridal or wedding show. You have tons of materials from all sorts of vendors and you are on wedding overload! You are probably asking now what do I do?!? If you read our previous article Bridal Shows: 5 tips for couples then you are prepared for this moment and I recommend you skip to step 3 and take a week or two off! If you haven’t read that article that is ok, there are a couple steps to do right away before you take your time off.

Step 1 – Take notes and Sort the materials

When you get home from the wedding show, or very shortly after (hopefully within a day), you will want to clear the floor and dump out your bag (or bags!) of information you received and start going through them. You will want to start separating the information into categories (venues, caterers, photographers, etc.). As you do, take a minute with each to remember each one and takes notes on what you remember. Think about how each one made you feel, a memorable quote or experience at their booth or while you were talking with them, your likes and concerns about their work and how they would work with you, and anything else you can think of. You want to do this while it is still fresh in your mind and when you can remember the most.

Step 2 – Order the categories by which you want to hire first

Next you want to order the vendor types into the order you are planning on booking them. This helps balance your priorities and all your desired pieces. It will also help you in step 4 to stay focused and should make decisions easier.

Step 3 – Take a break!

Now that you are all organized, you deserve a break! Take a week or two off to relax and recharge before you get into actually choosing your vendors. This will not only help you clear your head, but should help you narrow down your choices in each category.

Step 4 – Choosing your vendors

While each couple will approach this part differently, there are a few tips I can pass on here. First is to choose one vendor at a time according to your organized categories. This will let you more easily compare packages/offerings from vendors in this category and will let you deeply explore what you want from that type of vendor. Next, You will want to discuss each type of vendor together and make some choices before you start talking to vendors. For example, do you want a religious ceremony? Do you want the ceremony and reception all in one place? Do you want a DVD or digital files of your picture? How much are you hoping to spend on this category? And many other questions.

Once you have narrowed down what you want from each category, then take the first category and read the materials you collected, looking for those elements which you decided were most important for you.

Finally, choose your top 3-5 from each category based on what you want and your budget, and call them for a consultation. This will allow you to get a better feel for them and a personalized quote for your wedding. If you find what you feel is your perfect vendor from these consultations, put down your deposit and move on to the next category. If you are still on the fence and can’t seem to make a decision, move on to the next category and come back to it. The important thing is that you can make the decisions without feeling pressured or frustrated with the process. Planning your wedding should be a wonderful experience. And always remember the experts are there to help you. There are many wonderful planners and vendors out there that can help you along the way.

Happy Planning!!

What to expect at a portrait session part 3

After the Session: What happens to my pictures now?

Baby after smashing/eating a cake
Baby’s first birthday cakesmash

When you are finished with a portrait session, there is still a lot of work to be done for the photographer. The first thing that will happen after you leave is that the photographer will transfer the photos from the camera memory to several places. The first is the computer where the editing process will take place, the second is the primary back up, which for us this is another drive in the main editing computer. Finally there is usually at least one other backup done, such as to a server or other memory. This is the most critical time because until the photographer feels the photos are safe, there is always the possibility that something could go wrong and the pictures could be lost.

Once the photographer is satisfied that the pictures are safe and backed up, then the initial culling process happens. This is where the photographer goes through the pictures and removes all those where the subject (that’s you) is blinking, moving, or talking so that their expression is not good. After this initial culling process, the photos are then cropped as necessary and put into a proof gallery. This gallery is then given to you in some form (most photographers do online proof galleries now) so you can choose which photos you like and would like digitally mastered. This whole process typically takes a couple days to a week after the photo session depending on how busy your photographer is.

After you have chosen your favorite portraits, the photographer then goes back and perfects those photos. This can be as simple as adjusting a color or as complex as creating specialty colors or skin adjustments. The timing of this part of the process really depends on the proofs and what you wish to have done to them. Next, the portraits are adjusted for printing and for viewing to maximize their beauty for whatever form you wish them in. It can take anywhere from a couple days to a couple weeks to finish all these adjustments.

Finally, if you are having your portraits printed by the photographer then the printing process will begin. This again can vary depending on the number and size of prints you have ordered. This could be anywhere between a week and two weeks to get them all printed and shipped or delivered to you. If you ordered a high resolution CD or flash drive, then the pictures are burned onto the CD, which takes about an hour, and then it can be delivered to you.

If you are looking to save money overall, purchasing the HRCD with printing rights will save you money when you do want to make prints. Typically, whether the photographer is printing in-house or outsources printing to a professional lab, it is more expensive to print through the photographer than to have the prints done yourself. This is true for the lab we use as well. The wholesale cost to us as the photographer is more than they charge you as a consumer for the same service. Make sure you know what you are getting, however, as each photographer’s contract is different and will charge accordingly. There is a huge difference between getting printing rights or usage rights and getting the copyrights. Some people will insist that you MUST get the copyrights, but for most people, this is more expensive and more of a hassle than they would want.

This is a very generalized guide to what happens during a typical portrait session and is meant to help you be more comfortable with the process. The more comfortable you are, the better your portraits will be! I hope you have found it helpful.

What to expect at a portrait session part 2

During the Session

Now that you have all the details worked out, you are ready to head into the photography studio and get to the actual picture taking. This is why you originally called your photographer, but it can also be nerve racking, uncomfortable, and down right scary. Photographers know this and most will try to make the process as easy as possible while still working with you to help bring your vision of a family portrait to life.

If you have not done it before the session, the first thing that will happen is that you and your photographer will decide which backgrounds you would like to use. Most photographers will have several colored and/or patterned

Senior Portrait
Senior Portrait

backgrounds to choose from besides the standard black, white, and cream. This will help you choose an outfit if you brought more than one and will set the mood for your portrait. Solid black, white or cream backgrounds tend to be more serious and artistic, while colors and patterns can be used for both serious and more fun poses, giving them a bit more versatility.

Next, the photographer will have you sit or stand where you will be for your portraits and begin working with lighting. Lighting is a key ingredient to great portraits and it should take the photographer anywhere from 2-6 minutes to arrange things properly so you have the best lighting possible. This is also a great time for you to ask any questions you may have. This allows you not only to get even more of a feel for how the photographer works but also for you to relax a bit.

Being relaxed is one of the best things you can do to ensure your portraits will reflect the true you. A genuine smile can make a portrait and bring in that wow factor everyone desires, while a tense smile will show through and make you look rigid and unhappy. If the studio has the capability like ours does, you may wish to bring or request music to be played during your session which will help you be relaxed and more you.

Next comes the hardest part of the session, posing. Photographers will try to find the poses best suited for you, but this is where a little research beforehand can keep you in control of the photo shoot. Having 3 or 4 poses which you would like to try will help move things along and will give the photographer a really good idea of what you are looking for. Then the photographer may be able to suggest small changes or poses of a similar style which will complement you and still achieve the kind of portrait you are looking for.

Once you are posed, the photographer will begin taking the actual pictures. The biggest thing to remember during this time is that whatever you are feeling will come through in your eyes. You could have the greatest smile you have ever had, but it won’t matter if your eyes are saying you are uncomfortable or unhappy. A smile can be faked some of the time, what your eyes say cannot. This is why it is so important that you are comfortable with your photographer and why most photographers will ALWAYS suggest meeting before the actual photo session. The more comfortable you are, the more it will show through in your portraits and the better they will look.

Next time…Part three: After the portrait session

Previous blog: Part One: Before the Session